Someone told me that I should share my craft IQ/knowledge with others in a HOW-TO post
and I always thought, 'How in the world do I do that when I create off sheer feeling and intuition?' Well, I came up with a card that would be great to do with you...
and I always thought, 'How in the world do I do that when I create off sheer feeling and intuition?' Well, I came up with a card that would be great to do with you...
Please remember this is the first time I ever did a HOW-TO so please bear with me. Also this HOW-TO will be split into 2 posts.
This is my 2 Fold Flap Heart-n-Key Lovers Card.

This was one of the very first cards I ever created, but due to some the difficulty and design of this card I never tried to sell it.
So today I have decided to do this card over
and would love for you to join me.
Now the first thing I usually do is create a sketch of what I want to create. This helps my visualization, and dynamic size and layout concept of the card. Sometimes I color the sketch (not a must) but adding a sketch of the types of embellishments I would like on the card are.
So after I sketch is done I get my supplies together.
From the sketch and idea
you have created, you will know what you need to actually put your card together,
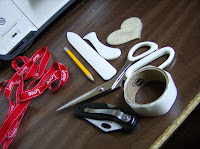
but for this card we will need:
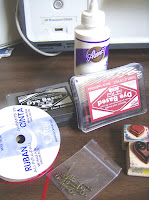
7-Red and Black Dye Based Ink
8-Heart rubber stamps
9-Tacky glue and Glue dots
10-12" Ruler
11-8.5"X11" white card stock paper
Our first step is to start from the ground up. In other words, we must create/construct the foundation which in this case is our white 8.5X11 card stock paper which will be the actual card.
So we want to take 3" from the width of the paper which will leave us with 5.5"X11".
*Always use your ruler to measure and be sure you are on target.
 (NOTE: You do not have to print on your card,
but if you want to print on your card,
you need to understand your printers
page set up to get the print in the center)


From the sketch and idea
you have created, you will know what you need to actually put your card together,
but for this card we will need:
1-Scissors
2-pencil(s)
3-Red LOVE printed Ribbon
4-Paper score and fold tool
5-Outlined shape of heart (unless you have great hand skills to freely draw the heart)
6-Antique Gold Keys2-pencil(s)
3-Red LOVE printed Ribbon
4-Paper score and fold tool
5-Outlined shape of heart (unless you have great hand skills to freely draw the heart)
7-Red and Black Dye Based Ink
8-Heart rubber stamps
9-Tacky glue and Glue dots
10-12" Ruler
11-8.5"X11" white card stock paper
Our first step is to start from the ground up. In other words, we must create/construct the foundation which in this case is our white 8.5X11 card stock paper which will be the actual card.
*For this card I used white card stock, but you can use what ever color you like.
Now to give this card 2 flaps that open up from the center, we need to know our measurements and to be equal on all sides like a square.So we want to take 3" from the width of the paper which will leave us with 5.5"X11".
*I did this because if you divide the paper in half you get
4.25X5.5, and remember we want a square shaped card.
A square has 4 equal sides so 4.25X5.5 is a little off.
After you cut the paper check always check it against a ruler to be sure you have the right height, length and width. Now we can get ready to score our paper equally on both sides...4.25X5.5, and remember we want a square shaped card.
A square has 4 equal sides so 4.25X5.5 is a little off.
*Always use your ruler to measure and be sure you are on target.

but if you want to print on your card,
you need to understand your printers
page set up to get the print in the center)

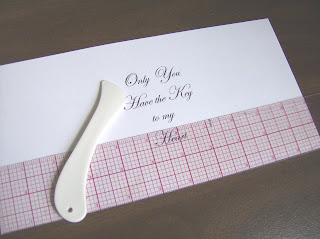
We need to score our paper the same amount on both sides. Remember we already cut 3" off the width leaving us with 5.5", so it becomes easier to make the entire card into a square with sides that will measure 5.5"X5.5".
Before we commit to our score,
we must first do some math...
we must first do some math...
11" minus 5.5" equals 5.5"
This means our flaps should add up to 5.5"
Now we need to figure out what is half of 5.5"? It is 2.75"
Each flap now becomes 2.75" wide by 5.5" high.
This means our flaps should add up to 5.5"
Now we need to figure out what is half of 5.5"? It is 2.75"
Each flap now becomes 2.75" wide by 5.5" high.
So we can score our paper 2.75" on the left and right.
Our next step is to trace and cut out our heart.
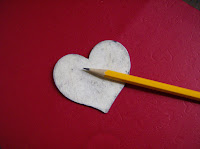
*Again paper is your choice, but for this card I used red heart embossed card stock. You may want to match your paper with a different color if you did not use white card stock as I did.
Our next step is to trace and cut out our heart.

*Again paper is your choice, but for this card I used red heart embossed card stock. You may want to match your paper with a different color if you did not use white card stock as I did.
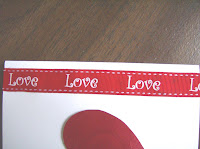
After you have cut out your heart, you want to get ready to cut your red LOVE print grosgrain ribbon. The ribbon you will cut to 5.5" and put on the flap of your choice. This time I have put the ribbon on the right side flap a 1/4" away from the edge of the card. You will use your tacky glue to attach the ribbon.
*PLEASE NOTE, you do not have to use this same ribbon.
You may want to use a different color or texture with print or no print.
You may want to use a different color or texture with print or no print.
Now we are gonna attach our heart to the right side flap. To do this we can use either our tacky glue or glue dots. The glue dots are idealistic to give your heart a 3D affect (it raises the heart above the card stock surface). No matter which you decide to use, remember you are only using half the heart to attach to the card stock. Use the flap edge as a ruler to measure precise split of the heart.
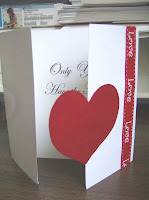
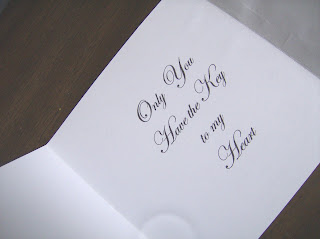
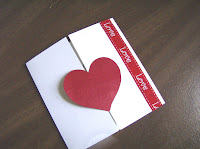 This is how your card should look thus far. -Card should be able to open and close with no problem.
-Heart should be split in half, so it looks like it is on both sides.
-Ribbon should be straight and a 1/4" away from the edge.
-Card should measure 5.5" width and 5.5" long (length).


 This is how your card should look thus far. -Card should be able to open and close with no problem.
-Heart should be split in half, so it looks like it is on both sides.
-Ribbon should be straight and a 1/4" away from the edge.
-Card should measure 5.5" width and 5.5" long (length).
Thanks for being here with me today!
In my next post we will finish the outside and in side of this card.
So please check back here often to see part 2 of
"LETS MAKE A CARD..."
Please feel free to post comments and questions
and I will try to get to all of them for the next post (part2 of 'Lets Make a Card')
In my next post we will finish the outside and in side of this card.
So please check back here often to see part 2 of
"LETS MAKE A CARD..."
Please feel free to post comments and questions
and I will try to get to all of them for the next post (part2 of 'Lets Make a Card')


